Secret DIY Appliance Maintenance: Extend Lifespan by 2 Years
Unlocking the secrets to DIY appliance maintenance can significantly extend the lifespan of your household machines by up to two years, effectively saving thousands on costly repairs and premature replacements through simple, proactive measures.
In a world where household budgets are increasingly stretched, the thought of an appliance malfunction can trigger immediate financial dread. Yet, many homeowners overlook a powerful, cost-effective solution right at their fingertips: Secret DIY Appliance Maintenance: Extend Lifespan by 2 Years and Avoid Costly Repairs. This comprehensive guide will illuminate the simple, yet profound, steps you can take to keep your essential home appliances running smoothly, often adding years to their functional life while saving you a substantial sum in repair bills and replacement costs.
The Hidden Cost of Neglect: Why Appliance Maintenance Matters
Every appliance in your home, from your refrigerator to your washing machine, represents a significant investment. While built to last, their longevity is not absolute; it is directly influenced by how they are maintained. Many consumers operate their appliances until a breakdown occurs, a reactive approach that often leads to expensive, unexpected repairs or the need for premature replacement.
The true cost of neglect extends beyond immediate repair bills. An inefficient appliance, clogged with lint or scale, consumes more energy, leading to higher utility bills each month. This silent drain on your finances can accumulate to hundreds, or even thousands, of dollars over the lifespan of the appliance. Moreover, the environmental impact of discarding appliances prematurely adds to landfill waste, a concern for the increasingly eco-conscious homeowner.
Understanding the “Lifespan Gap”
Manufacturers often provide an estimated lifespan for their appliances, but this figure is typically based on ideal operating conditions and regular maintenance. Most consumers fall short of these maintenance recommendations, inadvertently shortening their appliances’ useful lives. This creates a “lifespan gap” – the difference between how long an appliance *could* last and how long it *does* last in many homes.
- Refrigerators: Often last 10-15 years, but can fail sooner without regular coil cleaning.
- Washing Machines: Typically last 10-13 years, significantly reduced by detergent buildup or unbalanced loads.
- Dryers: Estimated at 10-13 years, but fire hazards and inefficiency rise rapidly with lint accumulation.
- Dishwashers: Around 9-10 years, though mineral deposits can dramatically cut this short.
Closing this gap requires a shift from reactive repairs to proactive care. It’s about adopting simple habits that extend beyond just fixing what’s broken, but actively preventing breakdowns and optimizing performance.
By understanding the mechanisms of wear and tear, and identifying the common culprits behind appliance failures, homeowners can strategically implement maintenance routines that not only preserve functionality but also enhance efficiency. This foresight transforms a potentially costly household burden into a manageable, empowering DIY project.
Essential Tools and Safety First: Preparing for DIY Maintenance
Before you dive into the intricacies of appliance care, it’s paramount to gather the right tools and, more importantly, prioritize safety. Many DIY maintenance tasks are straightforward and require only basic household tools, but neglecting safety precautions can turn a simple task into a hazardous situation.
Having the correct tools readily available ensures a smooth and efficient maintenance process. You won’t need a professional’s toolkit, but a few key items will be invaluable. Beyond the tools, understanding fundamental safety protocols is non-negotiable, especially when dealing with electricity, water, and moving parts.
Your DIY Appliance Toolkit
A well-equipped toolkit for appliance maintenance doesn’t have to be extensive or expensive. Most of these items are likely already in your home, or can be acquired affordably. These are the workhorses that will assist you in everything from tightening screws to cleaning hard-to-reach areas.
- Screwdrivers: Phillips and flathead, various sizes. Essential for accessing panels and tightening connections.
- Pliers: Needle-nose and regular. Useful for gripping small parts and bending wires (when applicable).
- Adjustable Wrench: For loosening and tightening hoses or connections.
- Multimeter: For basic electrical checks (optional, but highly recommended for more advanced DIYers).
- Cleaning Supplies: Microfiber cloths, brushes (nylon and wire), vinegar, baking soda, and appliance-specific cleaners.
- Vacuum Cleaner with Attachments: Crucial for removing dust, lint, and debris from vents and coils.
These tools, when used correctly, will empower you to perform a wide range of maintenance tasks yourself, significantly reducing your reliance on professional services.
Prioritizing Safety Protocols
No matter how simple the task seems, safety must always come first. Accidents involving appliances can be severe, ranging from electrical shocks to injuries from moving parts. Taking a few moments to ensure you’re working safely can prevent significant harm.
Always disconnect the appliance from its power source before beginning any maintenance. This is the single most important safety rule. For gas appliances, turn off the gas supply. When dealing with water lines, shut off the water supply to the appliance and drain any remaining water. Wear appropriate personal protective equipment, such as work gloves and safety glasses, especially when cleaning or dealing with potentially sharp components.
Never force parts or attempt repairs beyond your skill level. If you are unsure about a step or encounter a problem you cannot safely resolve, it’s always best to call a qualified professional. Your safety, and the integrity of your appliance, are not worth compromising.
The Refrigerator: Your Kitchen’s Workhorse Longevity Secrets
The refrigerator is arguably the most crucial appliance in any kitchen, running 24/7. Its continuous operation means it’s also highly susceptible to inefficiency and wear if not properly maintained. Simple DIY care can dramatically extend its life, prevent food spoilage, and reduce your electricity bills.
Many common refrigerator issues, such as excessive running, poor cooling, or strange noises, can be traced back to basic maintenance oversights. Addressing these proactively can save you a significant amount in repair costs and energy consumption. The goal is to ensure its components work efficiently, without undue strain.
Coil Cleaning: The Unsung Hero of Efficiency
The condenser coils at the back or bottom of your refrigerator are vital for dissipating heat. When these coils get covered in dust, pet hair, and debris, the refrigerator has to work harder to cool, leading to increased energy consumption and a shortened lifespan for the compressor.
Cleaning these coils is a straightforward task that should be performed at least once a year, or more frequently if you have pets. First, unplug the refrigerator. Then, locate the coils; they are usually behind a kick plate at the bottom front or on the back of the unit. Use a vacuum cleaner with a brush attachment or a specialized coil brush to thoroughly remove all accumulated dust and debris. This simple action can reduce your refrigerator’s energy consumption by up to 10% and significantly prolong its operational life.

Gasket and Drain Hole Maintenance
The rubber gaskets around your refrigerator and freezer doors create an airtight seal, keeping cold air in and warm air out. Over time, these gaskets can become brittle, dirty, or loose, compromising the seal and forcing your refrigerator to work harder. Check the gaskets regularly for cracks, tears, or signs of mold.
Clean the gaskets with warm, soapy water. If they are loose, gently re-seat them. A simple “dollar bill test” can help you identify a faulty seal: close the door on a dollar bill; if it slides out easily, the seal needs attention. Below the crisper drawers inside your refrigerator, you’ll find a small drain hole, which is part of the defrost drain system. This can become clogged with food particles, leading to water accumulation inside the fridge or leaks onto the floor. Clear this hole periodically using a cotton swab or a pipe cleaner, ensuring water can flow freely.
These seemingly minor tasks play a critical role in the overall efficiency and longevity of your refrigerator. By ensuring proper sealing and drainage, you prevent overworking of the cooling system and potential water damage, contributing directly to the appliance’s extended lifespan.
Washing Machine and Dryer: Tackling Laundry Day Longevity
Laundry appliances are among the most frequently used in a household, enduring significant stress with each cycle. Proper maintenance of washing machines and dryers is not just about extending their lifespan; it’s also crucial for consistent cleaning results, energy efficiency, and preventing common household hazards like dryer fires.
Many issues, from odd noises and foul odors to ineffective cleaning and drying, can often be resolved with routine care. Neglecting these workhorses can lead to expensive drainage problems, motor failure, and, in the case of dryers, a serious risk of fire due to lint buildup.
Washing Machine Care: Preventing Mold and Clogs
Contemporary washing machines, particularly front-loaders, are susceptible to mold and mildew growth around the door gasket due to moisture retention. This not only causes unpleasant odors but can also harbor bacteria, potentially affecting your laundry’s cleanliness.
- Gasket Cleaning: After each wash, wipe down the rubber gasket around the door with a damp cloth. Periodically, use a mixture of equal parts white vinegar and water, or a specialized washing machine cleaner, to thoroughly clean the gasket, paying special attention to crevices. Leave the door slightly ajar after cycles to allow the drum to air out.
- Detergent Dispenser Clean-out: Over time, detergent and fabric softener can accumulate in the dispenser, leading to blockages. Remove the dispenser drawer (if possible) and wash it thoroughly under running water. Use a small brush to clean any residue from the dispenser housing.
- Monthly Deep Clean: Run a hot cycle with two cups of white vinegar instead of detergent, followed by another hot cycle with half a cup of baking soda. This helps remove soap scum, mineral deposits, and odors from the machine’s interior.
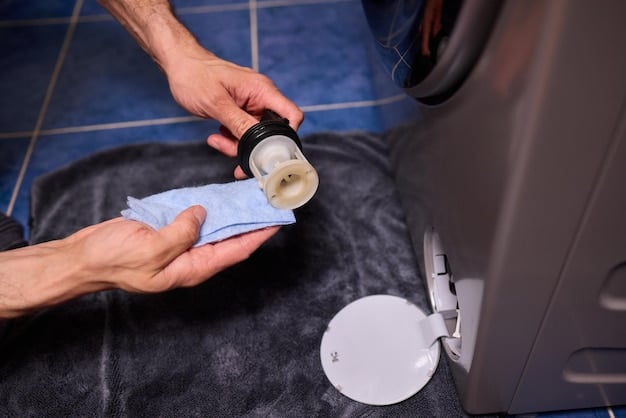
Additionally, check the washer’s water inlet hoses for any signs of cracks or bulges every few months, and replace them if necessary to prevent leaks. The small screen filters on the water inlet can also become clogged with sediment and should be cleaned periodically to ensure proper water flow.
Dryer Maintenance: Dryer Vent Cleaning and Beyond
The dryer is a major energy consumer, and its efficiency is directly tied to air circulation. Restricted airflow, primarily due to lint buildup in the vent, forces the dryer to work harder, increasing energy use and, critically, posing a significant fire risk.
Clean the lint filter after every load, without fail. This is the simplest yet most effective step to prevent lint accumulation. However, lint bypasses the filter and settles in the dryer vent line. This necessitates periodic, deeper cleaning:
- Exhaust Vent Cleaning: At least once a year, or more often if you notice clothes taking longer to dry, disconnect the dryer from the wall and pull it out. Detach the flexible duct from the back of the dryer and the wall. Use a vacuum cleaner with a long attachment or a specialized dryer vent brush kit to thoroughly clean out the entire length of the ductwork. Also, clean the exterior vent hood.
- Sensor Cleaning: Many dryers have moisture sensors that detect when clothes are dry and shut off the machine. These sensors can get a film of dryer sheet residue or lint, causing them to inaccurately detect dampness and potentially over-dry clothes. Locate these metal strips (usually inside the drum) and wipe them clean with a cloth and a little rubbing alcohol.
- Filter Cleaning: Most modern dishwashers have a removable filter (often located at the bottom of the tub). Check your manual for its location and removal instructions. Remove the filter and rinse it under hot running water to dislodge food particles. For stubborn grease or dried food, use a soft brush and dish soap. This should be done monthly.
- Door Gasket and Spray Arm Maintenance: Wipe down the door gasket regularly to remove food debris and mold. For the spray arms (upper and lower), ensure the small holes are not clogged. If they are, use a toothpick or wire to clear them out, ensuring an even spray pattern for effective cleaning.
- Monthly Deep Clean: Place a cup of white vinegar in an upright, dishwasher-safe bowl on the top rack and run an empty hot cycle. The vinegar helps to dissolve grease, soap scum, and mineral deposits. For deodorizing, sprinkle a cup of baking soda on the bottom of the empty dishwasher and run a short, hot cycle.
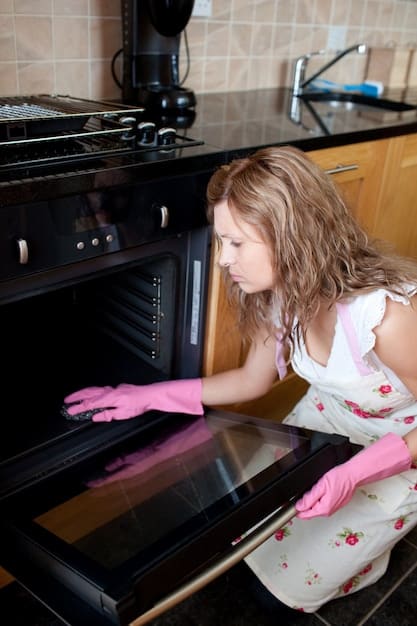
- Oven Cleaning: While many ovens have a self-cleaning feature, regular spot cleaning can reduce the need for harsh chemicals and high-heat cycles that stress the appliance. Wipe up spills immediately. For baked-on grime, a paste of baking soda and water can be effective. Apply, let sit for several hours or overnight, then wipe clean. Ensure the oven door gasket is clean and intact for proper heat retention.
- Rangehood Filter Cleaning: The filters in your rangehood trap grease and airborne particles, preventing them from accumulating on your kitchen surfaces and inside your ventilation system. Most metal mesh filters can be removed and washed in hot, soapy water (or run through the dishwasher if recommended by the manufacturer) every 1-3 months, depending on cooking frequency. Regularly cleaning these filters improves air quality and maintains efficient ventilation.
- Toaster: Always unplug before cleaning. Pull out the crumb tray (usually at the bottom) and empty it after every few uses. For stuck crumbs, gently shake the toaster upside down over a sink. Avoid using sharp objects inside, as you could damage internal heating elements. A clean toaster reduces the risk of smoke and allows for more even browning.
- Coffee Maker: Mineral buildup from water is the primary enemy of coffee makers, affecting taste and efficiency. Descale your coffee maker monthly or quarterly, depending on water hardness. Fill the water reservoir with equal parts white vinegar and water, and run a brewing cycle. Discard the vinegar mixture, then run 2-3 cycles with plain water to rinse thoroughly. Additionally, regularly clean the carafe and removable components with soap and water to prevent coffee oil buildup, which can turn rancid and affect flavor.
- Unusual Noises: While some noises are normal, persistent grinding, screeching, or loud banging can indicate serious mechanical issues, such as a failing motor, worn bearings, or issues with the compressor in your refrigerator.
- Electrical Malfunctions: Flickering lights, circuit breaker trips specific to an appliance, or sparks coming from a unit are immediate signs of electrical problems. Do not attempt to fix these yourself; unplug the appliance immediately and call an electrician or appliance repair specialist.
- Gas Leaks: If you smell gas near a gas appliance, turn off the gas supply, ventilate the area, evacuate, and immediately call your gas utility company and/or emergency services. Never attempt to locate or fix a gas leak yourself.
- Lack of Function/Major Component Failure: If your refrigerator isn’t cooling at all, your washing machine won’t drain, or your oven isn’t heating up, and basic troubleshooting (like checking power or cleaning filters) doesn’t resolve the issue, it’s likely a larger component failure that requires a professional diagnosis and repair.
By keeping your washing machine free of buildup and odors, and your dryer vent clear, you’re not just ensuring cleaner clothes and faster drying times, but also making a substantial contribution to the longevity of these appliances and the safety of your home.
Dishwasher and Oven: Maintaining Kitchen Cleaning and Cooking Efficiency
Dishwashers and ovens are cornerstones of many kitchens, simplifying daily chores and culinary endeavors. Their efficient operation relies on cleanliness and proper function of key components. Over time, food debris, grease, and mineral deposits can hinder their performance, leading to less effective cleaning, uneven cooking, and eventual breakdowns.
Proactive maintenance for these appliances is about more than just keeping them visibly clean; it’s about ensuring internal mechanisms are free from obstructions and buildup, allowing them to perform their intended functions seamlessly and extend their useful life significantly.
Dishwasher Deep Clean and Filter Care
Despite their purpose, dishwashers can accumulate food particles, grease, and hard water deposits, leading to foul odors, cloudy dishes, and even mechanical issues. Regular cleaning is essential for optimal performance.
These steps will prevent clogs, eliminate odors, and ensure your dishes come out sparkling clean. The longevity of your dishwasher significantly benefits from this regular attention, preventing strain on its motor and pump.
Oven and Rangehood Maintenance for Peak Performance
Ovens and rangehoods are susceptible to grease and food splatter, which, if left unchecked, can lead to unpleasant smells, reduced efficiency, and even fire hazards.
By keeping your dishwasher and oven meticulously clean and ensuring their components are functioning optimally, you’re not only enhancing your kitchen’s hygiene but also significantly contributing to the extended and efficient life of these hard-working appliances, saving you future hassle and expense.
Small Appliance TLC: Microwaves, Toasters, and Coffee Makers
While often overshadowed by their larger counterparts, small kitchen appliances like microwaves, toasters, and coffee makers are daily workhorses that also benefit immensely from regular maintenance. Neglecting them can lead to decreased performance, hygiene issues, and premature failure, often necessitating costly replacements.
These smaller units may not have as many complex parts, but their constant interaction with food and liquids makes them breeding grounds for crumbs, spills, and mineral buildup. Simple, consistent care can ensure they continue to operate safely and effectively for years beyond their expected lifespan.
Microwave Cleaning and Maintenance
Microwaves are prone to internal food splatters, which can become caked on and affect efficiency, harbor odors, and even pose a fire risk if left unaddressed. Regular cleaning is key to its longevity and hygienic operation.
To easily clean the interior, place a bowl of water with a few lemon slices or a tablespoon of white vinegar inside and microwave on high for 5-10 minutes until the window steams up. Let it sit for another 5 minutes, allowing the steam to loosen grime. Then, wipe down the interior with a damp cloth. Also, regularly clean the spinning plate, ensuring it’s free of debris that could hinder its rotation. Check the door seal for any signs of wear or damage, as a compromised seal can lead to energy leaks.
Toaster and Coffee Maker Care
Toasters and coffee makers deal with specific types of residue that require tailored cleaning approaches. For toasters, crumbs are the main culprit, while coffee makers battle mineral buildup and coffee oils.
These straightforward cleaning routines for your small appliances will not only keep them looking good but also ensure they continue to perform their essential functions flawlessly, avoiding the need for pricey replacements every couple of years. This small investment of time yields significant financial returns in the long run.
Proactive Measures and When to Call a Professional
While DIY maintenance can considerably extend the life of your appliances and save money, it’s crucial to understand its limits. Not every issue can be resolved with a screwdriver and a little elbow grease. Knowing when to call a professional not only prevents further damage but also ensures your safety.
The goal of DIY maintenance is to tackle common, manageable issues and prevent major breakdowns. However, complex electrical problems, sealed system failures in refrigerators, or significant gas line issues demand the expertise of a certified technician. Attempting repairs beyond your skill set can void warranties, cause more damage, or pose serious safety risks.
Recognizing the Signs: When DIY Isn’t Enough
Developing an ear and eye for the “red flags” your appliances might display is a vital part of proactive care. While some symptoms indicate a simple fix, others point to more serious underlying problems that require professional intervention.
Moreover, if an appliance is still under warranty, undertaking significant DIY repairs could void that warranty, leaving you responsible for future repair costs that would otherwise be covered. Always consult your warranty terms before attempting anything beyond basic cleaning and maintenance.
Building a Relationship with a Trusted Technician
Even for the most diligent DIYer, professional help will eventually be necessary. Identifying a reliable appliance repair technician before an emergency strikes can save you time, stress, and money. Look for professionals who are certified, insured, and have positive reviews.
A good technician can also offer valuable advice on preventive maintenance specific to your appliance models, sharing insights you might not find in general guides. Viewing professional repairs as an investment in the long-term health of your appliances, rather than just a cost, ensures they continue to serve your household efficiently and safely for years to come.
By understanding what you can confidently manage yourself and when to defer to an expert, you establish a balanced approach to appliance care that maximizes both their lifespan and your savings, while always prioritizing safety.
| Key Maintenance Point | Brief Description |
|---|---|
| ❄️ Refrigerator Coil Cleaning | Annually remove dust and debris from condenser coils for optimal cooling and energy efficiency. |
| 🧺 Washing Machine Deep Clean | Monthly run a hot cycle with vinegar/baking soda to remove soap scum, mold, and odors. |
| 🔥 Dryer Vent Cleaning | Clean lint filter after every load; yearly professional vent cleaning to prevent fire hazards and ensure drying efficiency. |
| 🍽️ Dishwasher Filter Care | Monthly remove and clean dishwasher filter to prevent clogs, odors, and ensure clean dishes. |
Frequently Asked Questions About Appliance Maintenance
▼
For most households, cleaning refrigerator coils annually is sufficient. However, if you have pets that shed a lot or if your home is particularly dusty, it’s advisable to check and clean them every six months to maintain optimal efficiency and prevent premature wear on the compressor.
▼
To prevent mold, always wipe down the door gasket and drum after each use, especially on front-loaders. Leaving the door slightly ajar when not in use allows air circulation to dry out the interior. Running a monthly cleaning cycle with white vinegar also helps eliminate mold and detergent residue.
▼
Absolutely. While the lint trap catches most lint, some bypasses it and accumulates in the dryer’s exhaust vent, creating a significant fire hazard and dramatically reducing drying efficiency. Professional or thorough DIY cleaning of the entire vent path should be done at least annually, or more often if clothes take longer to dry.
▼
To extend your dishwasher’s life and ensure clean dishes, regularly clean its filter from food debris, typically monthly. Also, run a descaling cycle with white vinegar every few months to remove hard water deposits. This prevents clogs in spray arms and keeps the pump working efficiently.
▼
For small appliances, descaling your coffee maker regularly (monthly to quarterly) is arguably the most beneficial task. Mineral buildup significantly impacts taste, brewing efficiency, and shortens the machine’s lifespan. Similarly, consistently cleaning toaster crumb trays prevents fire risks and odors.
Conclusion
Embracing a proactive approach to appliance maintenance is not merely about tidying up; it’s a strategic financial decision and an empowering lifestyle choice. By dedicating a small amount of time to simple, routine care, you gain significant returns: extending the functional life of your vital household appliances by years, avoiding unexpected and costly repair bills, and reducing your monthly utility expenses. These “secret” DIY tactics are accessible to everyone, transforming potential budget strains into tangible savings and a more efficient, harmonious home environment. Invest in your appliances’ longevity, and they will, in turn, serve you faithfully for years to come.


