DIY Home Improvement: Save $200+ on Small Repairs

Repairing minor household issues yourself, such as leaky faucets, drywall holes, or clogged drains, offers significant savings on professional contractor fees, potentially exceeding $200 per repair, while building valuable home maintenance skills.
In an era where every penny counts, mastering a few basic home repairs can translate into substantial financial relief. This guide explores how DIY Home Improvement: Tackle Small Repairs Yourself and Save $200+ on Contractor Costs.
The undeniable value of DIY for homeowners
For most homeowners, the thought of undertaking home repairs can be daunting. Yet, the empowerment and financial benefits of DIY (Do-It-Yourself) are immense. While some projects necessitate professional expertise, a surprising number of common household issues are well within the grasp of the average individual, requiring only basic tools, a bit of research, and a willingness to learn.
Embracing DIY for minor repairs not only saves immediate cash but also builds long-term confidence and self-sufficiency. Imagine the satisfaction of fixing a persistent drip or patching a wall without having to schedule a contractor, wait for an appointment, and then pay a hefty service fee. This immediate gratification, combined with the tangible savings, forms a compelling argument for rolling up your sleeves.
Understanding common repair costs
To truly appreciate the savings, it’s essential to understand the typical costs associated with minor home repairs when hiring a professional. Even for seemingly small tasks, contractors often have minimum service charges that can quickly add up. These charges cover their travel time, specialized tools, insurance, and expertise, regardless of the simplicity of the job.
- Plumbing leaks: A dripping faucet or minor pipe leak might seem trivial, but a plumber’s visit can easily range from $100 to $300, even for a quick fix involving a washer replacement or tightening a joint.
- Drywall damage: Small holes or cracks in drywall, perhaps from moving furniture or settling, can cost $150 to $400 for a patch and paint job by a professional.
- Clogged drains: While some clogs require professional snaking, many can be cleared with simple tools. A plumber called for a kitchen sink clog could charge $100 to $250.
- Loose fixtures: Reattaching a wobbly towel bar or a loose cabinet handle might take minutes, but a handyman’s service call often starts at $75-$150.
By contrasting these figures with the minimal cost of materials (often under $20-$30 for most small repairs), the financial wisdom of DIY becomes clear. The savings on even a single small repair can be significant, and tackling multiple issues throughout the year can liberate hundreds, if not thousands, of dollars that can then be allocated to other financial goals or more extensive home improvements.
Essential tools and supplies for the DIY novice
Embarking on your DIY journey doesn’t require an arsenal of expensive, specialized tools. Many common small repairs can be tackled with a modest collection of basic implements that are useful for a wide array of household tasks. Investing in quality versions of these staple tools will serve you well for years to come.
Start by assessing what you already have. Many households possess at least a basic screwdriver set or a hammer. From there, gradually build your toolkit as specific projects arise. Prioritize versatility and durability when making purchases. Remember, the goal is to equip yourself efficiently, not to accumulate every tool imaginable.
The beginner’s toolbox: what you really need
A well-stocked beginner’s toolbox should include items that cater to common repair scenarios. This core set will provide the flexibility to address most small issues without needing a trip to the hardware store for every new problem.
- Screwdriver set: Both Phillips and flathead screwdrivers in various sizes are indispensable for everything from tightening loose handles to opening up appliance panels.
- Hammer: A standard claw hammer is useful for hanging pictures, light demolition, and general assembly tasks.
- Pliers: A set including slip-joint, needle-nose, and possibly locking pliers will cover various gripping, bending, and cutting needs.
- Adjustable wrench: This single tool can substitute for a set of open-end wrenches, useful for plumbing fixtures and other fasteners.
- Tape measure: Essential for accurate measurements in any repair or installation project.
- Utility knife: For cutting boxes, opening packages, or precision cuts on various materials.
- Safety glasses and work gloves: Always prioritize safety. These inexpensive items protect your eyes and hands from debris and abrasions.
Beyond this core, consider adding a level for ensuring straight lines, a stud finder for locating framing behind walls, and a small hand saw for minor cuts. For supplies, keep a stock of common items like assorted screws, nails, electrical tape, painter’s tape, wood glue, and various adhesives. These consumables are relatively inexpensive and prevent delays when a quick fix is needed.
Having these tools readily available minimizes the mental barrier to attempting a repair. Instead of postponing a task until you can buy a specialized item or call a professional, you’re empowered to tackle it immediately. This readiness not only saves money but also prevents small issues from escalating into larger, more expensive problems.
Mastering common household plumbing fixes
Plumbing issues, even minor ones, can quickly become frustrating and wasteful. A constantly dripping faucet can waste gallons of water per day, leading to higher utility bills, while a slow drain can make daily chores cumbersome. Fortunately, many common plumbing problems are simple to diagnose and fix with minimal tools and a basic understanding of how they work.
Tackling these tasks yourself can save you the significant expense of calling a plumber for what often amounts to a quick, straightforward repair. The key is to approach these fixes systematically, ensuring you have the right parts and an understanding of the steps involved. Always remember to turn off the water supply to the affected fixture before beginning any work.
Fixing a leaky faucet: a step-by-step guide
A leaky faucet is one of the most common plumbing nuisances. Often, the culprit is a worn-out washer or O-ring. Fixing it can be a quick and satisfying project that saves you from unnecessary water waste and plumber’s fees.
- Turn off the water: Locate the shut-off valves under the sink or the main water shut-off for your home. Turn them off completely.
- Disassemble the faucet handle: Depending on your faucet type, you might need to pry off a decorative cap to access a screw. Unscrew and remove the handle.
- Remove the faucet body/stem: Use an adjustable wrench to carefully loosen and remove the packing nut or retaining nut. Lift out the faucet stem or cartridge.
- Replace worn parts: Inspect the rubber washers, O-rings, or the entire cartridge for signs of wear. Take the old parts to a hardware store to ensure you purchase exact replacements.
- Reassemble: Insert the new parts, then reassemble the faucet in reverse order, being careful not to overtighten screws or nuts.
- Test: Turn the water supply back on slowly and check for leaks.
If the leak persists, it might indicate a more complex issue, but often, this simple replacement is all that’s required. The cost of a few washers or an O-ring set is negligible compared to a service call.
Clearing clogged drains: simple methods that work
Before calling a professional for a clogged drain, try these DIY methods. Many clogs are caused by hair, grease, or food particles accumulating close to the drain opening.
- Boiling water and dish soap: For kitchen sink clogs (often grease-based), pour boiling water down the drain, followed by a cup of dish soap. Let it sit for 20-30 minutes, then flush with hot water.
- Baking soda and vinegar: A classic solution for many clogs. Pour a cup of baking soda down the drain, followed by a cup of white vinegar. Cover the drain and let the fizzing action work for 30 minutes to an hour before flushing thoroughly with hot water.
- Plunger: A reliable tool for toilet and sink clogs. Ensure a good seal over the drain and plunge vigorously for 20-30 seconds. Repeat if necessary.
- Drain snake/auger: For deeper clogs, a hand-held drain snake (available at hardware stores for under $20) can be pushed down the drain to break up or retrieve the obstruction.
By familiarizing yourself with these basic plumbing fixes, you not only save money but also gain a valuable skill set that will serve you well as a homeowner. These small victories contribute significantly to maintaining your home efficiently and cost-effectively.
Quick fixes for walls and doors
The walls and doors of our homes bear the brunt of everyday life, often accumulating small damages like scuffs, dings, and loose hinges. While seemingly minor, these imperfections can detract from a home’s overall appearance and, if left unaddressed, can sometimes worsen. Fortunately, many common wall and door issues are straightforward to repair, requiring minimal effort and inexpensive materials.
Tackling these fixes yourself offers immediate aesthetic improvements and prevents the need for more extensive, costly repairs down the line. It’s about maintaining the integrity and visual appeal of your living space without incurring the expense of a professional handyman.
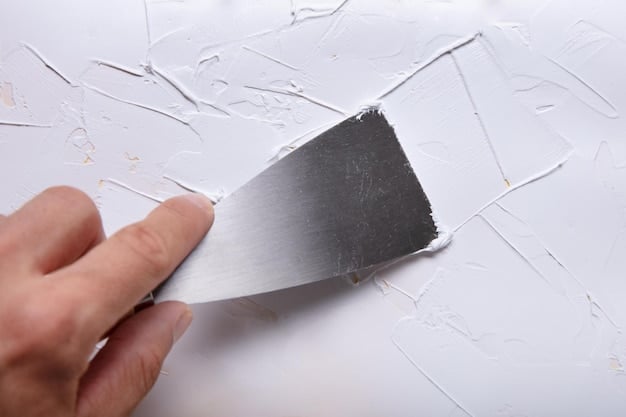
Patching drywall holes and cracks
Drywall damage is a common occurrence, from small nail holes to larger impacts. The good news is that patching these imperfections is a relatively simple DIY task that yields impressive results.
- Clean the area: Ensure the damaged area is free of loose debris or dust.
- For small holes (nail/screw holes): Use lightweight spackling paste and a small putty knife. Apply a thin layer over the hole, letting it dry. Sand lightly and apply a second coat if needed.
- For medium holes (up to 4 inches): Use a self-adhesive mesh patch. Place the patch over the hole, then apply two thin coats of joint compound over the patch, feathering the edges. Sand smooth once dry.
- For cracks: Widen the crack slightly with a utility knife to allow the joint compound to penetrate better. Apply joint tape over the crack, then two thin coats of joint compound, sanding between coats.
- Prime and paint: Once the patch is smooth and dry, prime the area and paint to match the wall.
The total cost for materials like spackle, joint compound, and a patch kit is usually under $30, a fraction of what a professional would charge for the same job.
Tightening loose door hinges and knobs
Squeaky or loose doors are not only annoying but can also signify potential misalignment. Tightening hinges and door knobs is a quick fix that improves function and reduces wear.
- Loose hinges: First, try tightening the existing screws with a screwdriver. If the screws spin freely, the wood screw holes are stripped. Remove the screw, insert a wooden golf tee or a few toothpicks with wood glue into the hole, let it dry, then break off the excess and reinsert the screw. This provides new material for the screw to bite into.
- Squeaky hinges: Apply a few drops of lubricating oil (like WD-40 or silicone spray) directly onto the hinge pin. Open and close the door several times to distribute the lubricant.
- Loose door knobs/handles: Most door knobs have exposed or hidden screws that hold the two halves together or secure them to the door. Locate these screws and tighten them. For knobs with hidden screws, you may need to pop off a decorative plate or find a small latch to release the cover.
These seemingly minor repairs contribute significantly to the overall comfort and longevity of your home. They are excellent entry points for developing your DIY skills, providing immediate and tangible results without a substantial investment of time or money.
Electrical safety and simple light fixture fixes
When it comes to electrical work, safety is paramount. Always, always turn off the power at the circuit breaker before attempting any electrical repair, even seemingly simple ones. A non-contact voltage tester is a worthwhile investment to confirm that the power is indeed off before you touch any wires. While complex electrical issues should always be left to a licensed electrician, many basic tasks, like replacing a light switch or fixing a non-functioning fixture, are well within a competent DIYer’s capabilities.
Understanding basic wiring principles and following safety guidelines meticulously can save you significant costs. Electricians often charge a high hourly rate for even minor jobs, making DIY repairs financially attractive for those willing to learn and proceed with caution.
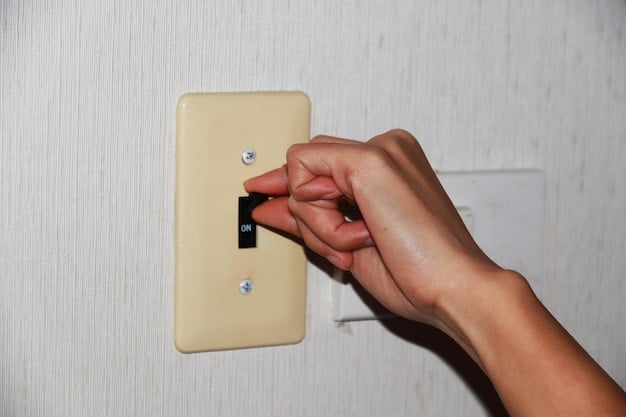
Replacing a light switch or outlet
Replacing a faulty light switch or a loose electrical outlet is a common DIY task that can restore functionality and improve safety. This repair typically involves disconnecting the old unit and wiring in the new one, following a consistent color-coded system.
- Safety first: Go to your electrical panel and turn off the circuit breaker that controls the power to the light switch or outlet you’ll be working on. Tag the breaker so no one accidentally turns it back on.
- Test for power: Use a non-contact voltage tester to confirm that no power is flowing to the switch or outlet. Touch the probes to the visible wires. If the tester remains silent, it’s safe to proceed.
- Remove old unit: Unscrew the faceplate and then the mounting screws holding the switch or outlet in the electrical box. Gently pull the unit out.
- Disconnect wires: Carefully unhook the wires from the old switch/outlet. Pay attention to which wire goes to which terminal (e.g., black to brass, white to silver, green/bare to green screw). Consider taking a photo for reference.
- Connect new unit: Attach the wires to the new switch/outlet matching the previous connections. Ensure the wire ends are properly stripped and securely wrapped around the terminal screws in a clockwise direction.
- Install: Carefully push the wires back into the electrical box, then secure the new switch/outlet with mounting screws. Attach the faceplate.
- Restore power and test: Turn the circuit breaker back on and test the light switch or outlet to ensure it works correctly.
A new switch or outlet typically costs less than $10, which represents significant savings compared to an electrician’s minimum service call. This task is a prime example of a safe and effective DIY electrical repair.
Troubleshooting non-functioning light fixtures
Before assuming a light fixture is broken, check the simplest solutions first. A fixture not turning on could be a quick fix or an indication of a more involved issue.
- Check the bulb: It sounds obvious, but ensure the light bulb is properly screwed in and not burnt out. Try a new bulb to rule out the simplest cause.
- Check the circuit breaker: A tripped breaker can cut power to a fixture. Locate your electrical panel and check if any breakers are in the “off” or “tripped” position (usually midway). Flip it fully off, then back on.
- Inspect the fixture itself: With the power off at the breaker, carefully remove the fixture’s cover. Look for loose connections or corroded wires. Tighten any loose wire nuts. If bulbs are consistently burning out in one fixture, it might indicate a wiring issue or a fixture that’s not rated for the bulb wattage being used.
- GFCI outlet tripped: If the fixture is connected to a GFCI (Ground Fault Circuit Interrupter) outlet, check if that outlet has tripped. Press the “reset” button on the GFCI outlet.
While electrical work requires diligence and a healthy respect for safety, mastering these simple repairs can be incredibly beneficial. The confidence gained from successfully troubleshooting and fixing an electrical issue outweighs the minimal cost of tools and materials, letting you illuminate your home efficiently and economically.
Window and screen repair essentials
Windows and screens are vital components of any home, contributing to insulation, security, and air circulation. Over time, they can suffer damage from weather, accidents, or general wear and tear. Common issues include cracked windowpanes, torn screens, and drafty frames. While extensive window replacement is a job for professionals, many minor repairs can be easily handled by the homeowner, leading to significant savings and improved home comfort. These DIY fixes not only save money but also extend the life of your windows and screens, maintaining your home’s energy efficiency and aesthetic appeal.
Addressing these issues promptly can prevent small problems from escalating. A small tear in a screen, for instance, can quickly become an entry point for insects, while a minor draft around a window can lead to higher utility bills. Being proactive with these repairs is a smart move for any homeowner.
Mending torn window screens
Torn window screens are a common annoyance, letting in bugs and detracting from your home’s appearance. Replacing an entire screen can be labor-intensive, but repairing small tears is remarkably simple.
- Small tears/holes: For small punctures or tears (less than 1 inch), a screen repair kit with adhesive patches or strips is ideal. These kits are inexpensive and allow for quick, localized fixes. Clean the area around the tear, peel the backing off the patch, and firmly press it over the damaged section.
- Larger tears: For more extensive tears that don’t warrant full screen replacement, you can cut a section from a roll of new screen material (ensure it matches your existing screen type – fiberglass, aluminum, etc.). Overlap the patch by at least an inch on all sides of the tear, and secure it with a strong clear adhesive or by weaving thin wire or thread through the screen mesh at the edges.
Repairing screens yourself costs only a few dollars for a patch kit or a small roll of screen material, compared to $50-$100+ for a new custom-built screen from a professional service.
Sealing drafty windows and doors
Drafts around windows and doors can lead to significant energy loss, making your heating and cooling systems work harder. Sealing these gaps is a low-cost, high-impact DIY project that can immediately improve comfort and reduce utility bills.
- Caulking: Inspect the exterior perimeter of your window frames where they meet the siding or brick. If you see gaps or cracked caulk, remove the old caulk and apply a new bead of exterior-grade sealant. For interior gaps between the window frame and wall, use an interior-grade paintable caulk.
- Weatherstripping: Check the weatherstripping around the operable parts of your windows and doors. If it’s old, cracked, or missing, replace it. Self-adhesive foam, rubber, or V-strip weatherstripping is easy to install and effectively seals gaps when the window or door is closed.
- Window film kits: For single-pane windows or those with persistent drafts, shrink-wrap window film kits can create an insulating air pocket. These kits are inexpensive and relatively easy to install, acting as a temporary secondary pane.
These sealing techniques require minimal investment in materials—a tube of caulk ($5-$10) or a roll of weatherstripping ($10-$20)—but can result in substantial savings on energy bills. The immediate comfort of a draft-free home is an added bonus, making these DIY repairs incredibly rewarding.
Furniture and cabinet repairs: Extending their life
Furniture and cabinets are often significant investments in a home’s aesthetics and functionality. Over time, however, daily use can lead to common issues such as loose joints, scratched surfaces, or broken hinges. While seemingly minor, these damages can reduce the lifespan of your furnishings and detract from your home’s appearance. Thankfully, many of these issues are straightforward to rectify with basic tools and a little patience, saving you the expense of replacement or professional repair.
Embracing DIY for furniture and cabinet repairs not only saves money but also encourages a sustainable approach to home ownership, reducing waste and preserving valuable items. It’s about restoring functionality and beauty to pieces you already own and appreciate.
Fixing wobbly chairs and tables
Few things are as annoying as a wobbly chair or a shaky table. This issue often stems from loose joints or screws that have worked their way free over time. Tightening these connections can restore stability and extend the life of your furniture.
- Identify the source of instability: Turn the piece upside down or carefully inspect all joints. Look for loose screws, dowels, or mortise-and-tenon connections.
- Tighten screws: For chairs with visible screws (often at the leg-to-seat or stretcher-to-leg connections), simply tighten them using the appropriate screwdriver. Be careful not to overtighten, which can strip the wood.
- Reglue loose joints: If screws don’t solve the problem, or if the furniture is doweled or mortise-and-tenoned, the joints may need regluing. Disassemble the wobbly section if possible. Scrape off any old, dried glue. Apply a generous but even coat of strong wood glue to both surfaces of the joint, reassemble, and clamp firmly. Wipe off excess glue immediately. Allow the glue to dry completely (often 24 hours) before using the furniture.
- For persistent wobbles: Sometimes, the legs themselves are uneven. Try adding small felt pads or shims under the shortest leg to stabilize the piece.
A bottle of wood glue costs around $5-$10, and a basic clamp set can be found for under $30. These small investments protect larger investments in your furniture and provide long-term stability.
Cabinet hinge adjustments and minor surface repairs
Kitchen and bathroom cabinets endure daily wear, leading to misaligned doors, loose hinges, and surface blemishes. These are typically simple fixes that can greatly improve the functionality and appearance of your cabinetry.
- Adjusting cabinet hinges: Many modern cabinet hinges have multiple adjustment screws that allow you to move the door up, down, left, right, in, or out. Using a screwdriver, turn these screws one-quarter turn at a time, checking the door’s alignment after each adjustment until it sits flush and even. This is often the solution for doors that don’t close properly or are crooked.
- Tightening loose hinges: If a hinge is visibly loose, tighten its mounting screws. If the screw holes are stripped, use the golf tee/toothpick and wood glue trick mentioned in the drywall section to create new material for the screws to grip.
- Repairing minor scratches/dings: For light scratches on wood cabinets, furniture marker pens or wood repair crayons matched to your wood color can effectively hide imperfections. For deeper dings, wood filler can be used, sanded smooth, and then stained or painted to match.
These minor repairs can revitalize your furniture and cabinets, making them look and function like new without the expense of professional refinishing or replacement. The skills learned from these tasks are easily transferable and build confidence for future DIY endeavors.
The long-term benefits of DIY: Beyond immediate savings
While the immediate financial savings are often the primary motivator for homeowners to tackle DIY projects, the benefits extend far beyond the immediate reduction in contractor costs. Embracing a DIY mindset for home maintenance fosters a range of skills, builds confidence, and contributes to a deeper understanding of your home. This holistic approach to home ownership not only empowers you but also potentially increases your home’s value and resilience.
Consider the cumulative effect: each successful repair builds upon the last, gradually transforming apprehension into capability. This accumulation of experience is invaluable, equipping you to handle minor emergencies and potentially spot developing issues before they become major problems.
Building skills and confidence
Every DIY repair, no matter how small, is a learning opportunity. Whether it’s figuring out how to use a new tool, understanding the mechanics of a faucet, or correctly patching drywall, each project adds to your repertoire of skills. This hands-on experience is far more impactful than merely reading instructions; it solidifies knowledge and builds practical competence.
- Problem-solving abilities: When faced with a repair, you learn to diagnose the issue, research solutions, and apply practical steps. This process hones your critical thinking and problem-solving skills which are transferable to all aspects of life.
- Increased self-reliance: The ability to fix things yourself reduces dependency on external services. This self-reliance is empowering and can alleviate stress during minor home emergencies.
- Greater understanding of your home: By working on different components of your house, you build an intimate knowledge of its systems—plumbing, electrical, structural—which makes you a more informed and proactive homeowner.
The confidence gained from successfully completing a repair is a significant psychological benefit. It validates your effort and encourages you to tackle more complex projects in the future, fostering a positive feedback loop of learning and achievement.
Preventative maintenance and long-term value
A strong DIY foundation naturally leads to an increased focus on preventative maintenance. When you’re capable of fixing small issues, you’re more likely to address them promptly rather than letting them fester and grow into costly problems. This proactive approach is key to preserving your home’s condition and value.
For example, knowing how to clean gutters regularly prevents water damage to your roof and foundation. Understanding how to seal drafts not only saves energy but also protects your home from moisture intrusion. These preventative measures, often simple and inexpensive when done regularly, can avert major repair expenses down the line.
Furthermore, a well-maintained home holds its value better. Potential buyers appreciate a home that shows evidence of consistent care and attention. By tackling small repairs and performing routine maintenance, you’re not just saving money today; you’re investing in the long-term health and marketability of your most significant asset. The combination of immediate savings, skill development, and long-term home preservation makes DIY an incredibly wise and rewarding pursuit for any homeowner.
| Key Area | DIY Benefit |
|---|---|
| 🛠️ General Repairs | Save $100-$400 per professional service call for jobs like drywall patches or loose fixtures. |
| 💧 Plumbing Fixes | Avoid $100-$300 plumber fees for leaky faucets or simple drain clogs. |
| ⚡ Electrical & Lights | Eliminate $75-$250 electrician costs for switch/outlet replacement. |
| 📚 Skill Development | Gain confidence, expertise, and long-term savings through continuous learning. |
Frequently Asked Questions About DIY Home Repairs
▼
Start small with low-risk projects like patching a small drywall hole or tightening a loose screw. Watch online tutorials and read guides to understand the process. Investing in a basic toolkit is also crucial. As you gain confidence, you can gradually move on to more complex tasks, saving more money along the way.
▼
For most common minor repairs (e.g., leaky faucet, drywall patch, clogged drain), you can easily save $100 to $400 per repair by avoiding contractor fees. Over a year, tackling just a few such issues can accumulate savings of several hundreds of dollars, potentially over $200 per project if the material costs are low.
▼
Always call a professional for complex or dangerous jobs. This includes extensive electrical wiring, major plumbing overhauls (like burst pipes or water heater issues), structural repairs, gas line work, or anything that could involve permits. When in doubt about safety or legal requirements, err on the side of caution and hire an expert.
▼
Common mistakes include not turning off power/water, using the wrong tools, rushing the job, or skipping safety precautions. Also, failing to properly research the repair or using incorrect materials can lead to bigger problems. Always take your time, double-check your work, and prioritize safety above all else.
▼
There’s a wealth of information available. YouTube channels from experienced DIYers offer visual step-by-step guides. Reputable home improvement websites (like This Old House, Family Handyman, or major hardware store sites) provide detailed articles. Community forums and local workshops can also offer valuable advice and hands-on learning experiences.
Conclusion
Embracing the world of DIY home improvement for small repairs is a powerful way to take control of your living space and your finances. By tackling common issues such as leaky faucets, drywall holes, or drafty windows yourself, you not only unlock immediate savings of potentially $200 or more per repair but also cultivate invaluable skills and confidence. This journey transforms daunting tasks into achievable projects, contributing to a more resilient home and a more self-reliant you. The small efforts invested today in learning and practice will pay dividends for years to come, making your home more comfortable, efficient, and truly your own.


