DIY Furniture Restoration: Revive Old Pieces, Save Big
Restoring old furniture through DIY methods not only breathes new life into worn items but also offers substantial financial savings, providing a sustainable and cost-effective alternative to purchasing new pieces.
In a world increasingly focused on sustainability and smart financial choices, the appeal of <DIY furniture restoration: give old pieces new life and save hundreds> is becoming undeniable. It’s more than just a hobby; it’s a practical skill that offers both creative fulfillment and significant economic advantages. Imagine transforming a forgotten, dusty antique into a vibrant centerpiece or salvaging a curbside find to furnish your home without breaking the bank. This comprehensive guide will explore the art and science of furniture restoration, demonstrating how you can achieve stunning results while contributing to a more sustainable lifestyle.
The Enduring Allure of Furniture Restoration
Furniture restoration is more than simply repairing a broken leg or touching up a scratch; it’s an art form that brings history, craftsmanship, and personal style together. This process allows individuals to not only preserve the unique character and stories embedded within older pieces but also to tailor them perfectly to modern aesthetics and needs. There’s an undeniable satisfaction in seeing an item that was once deemed worthless regain its former glory or even surpass it with a contemporary twist.
The practice of restoration dates back centuries, evolving from necessary repairs to a celebrated craft. Early restoration focused on practicality, making items functional again. Over time, it grew into a refined skill, balancing preservation with enhancement. Today, it stands as a testament to durability, offering a tangible connection to the past while remaining relevant in the present. This journey from repair to art highlights the lasting human desire to mend, repurpose, and create beauty from what already exists.
Rediscovering Quality and Craftsmanship
Modern mass-produced furniture often prioritizes affordability and convenience over durability. Many pieces are designed for temporary use, leading to a “throwaway” culture. In contrast, older furniture was often built to last, using solid wood, hand-cut joinery, and durable construction techniques. Restoring such pieces means investing time and effort into something genuinely substantial.
- Superior Materials: Older furniture frequently uses hardwoods like oak, maple, and cherry, which are more resilient and age gracefully compared to particle board or veneer.
- Expert Joinery: Dovetail joints, mortise and tenon joints, and dowel construction were common, ensuring furniture that could withstand generations of use.
- Hand-Finished Details: Many vintage pieces boast intricate carvings, inlay work, and hand-applied finishes that speak to the artisan’s dedication.
By restoring these items, we not only save money but also acquire furniture that is often superior in quality, design, and longevity. This commitment to quality transforms a simple repair into a valuable asset, enriching both our living spaces and our appreciation for enduring craftsmanship.
Environmental and Economic Impact
Beyond personal satisfaction, furniture restoration offers significant environmental and economic benefits. The manufacturing of new furniture consumes vast resources, from timber and metals to energy and chemicals. Disposing of old furniture contributes to landfill waste. By choosing to restore, you participate in a powerful cycle of reuse and reduction.
- Reduced Waste: Diverting furniture from landfills lessens environmental burden and conserves space.
- Lower Carbon Footprint: Restoring uses far less energy and fewer new materials than manufacturing new items.
- Financial Savings: The upfront cost of a second-hand piece plus restoration materials is almost always less than buying new, especially for high-quality items.
This approach fosters a sustainable lifestyle, making a tangible difference in both your wallet and the planet’s health. It’s a practical way to embrace eco-friendly practices without sacrificing style or comfort, reinforcing the idea that beauty and sustainability can coexist harmoniously.
Ultimately, the enduring appeal of furniture restoration lies in its multifaceted benefits: it’s a creative outlet, a smart financial move, and a responsible environmental choice, all wrapped into one rewarding activity. It empowers individuals to extend the life of beautiful objects, transforming them from relics of the past into functional treasures for the future.
Essential Tools and Materials for DIY Restoration
Embarking on a furniture restoration project requires more than just enthusiasm; it demands the right set of tools and materials. While the specific items needed will vary depending on the project’s complexity and the type of finish, a core collection will serve most beginners well. Investing in quality tools from the outset can save time, frustration, and ensure better results.
The process often involves several stages: cleaning, stripping (if necessary), repairing, sanding, and finally, finishing. Each stage has its own particular demands and corresponding tools. Understanding these requirements beforehand helps in planning and budgeting, ensuring a smoother restoration journey. Start with the basics and expand your collection as your skills and projects grow in ambition.
Preparing Your Workspace and Safety Gear
Before any sanding or stripping begins, it’s crucial to set up a safe and efficient workspace. Ventilation is paramount, especially when working with chemical strippers or strong glues. A well-lit area is also essential for intricate work, allowing you to see imperfections and ensure precise applications. Safety should never be an afterthought, as neglecting it can lead to serious health risks.
- Ventilation: Work outdoors, in a garage with open doors, or a well-ventilated room with fans.
- Gloves: Chemical-resistant gloves (nitrile or butyl) for strippers and paint, and general work gloves for handling wood.
- Eye Protection: Safety glasses or goggles are non-negotiable to protect against dust, chemical splashes, and flying debris.
- Respirator Mask: Essential for protecting lungs from fine dust particles during sanding and fumes from chemicals.
Preparing your workspace adequately minimizes risks and maximizes productivity, allowing you to focus on the craft rather than worrying about safety hazards. A clean and organized area also prevents accidents and ensures your tools are easily accessible when needed.
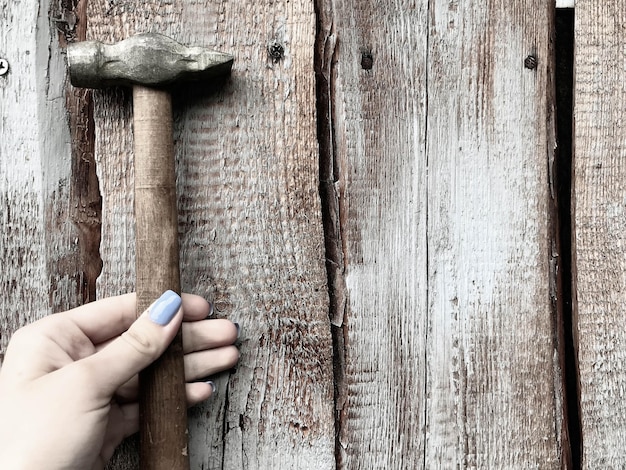
Key Tools for Disassembly and Repair
Many restoration projects begin with disassembling the piece to access all surfaces and identify underlying structural issues. Simple hand tools are often sufficient for this stage, providing control and precision. For repairs, a strong wood glue and clamps are indispensable for reattaching loose joints or mending breaks.
- Screwdrivers and Wrenches: For removing hardware, hinges, and existing fasteners.
- Rubber Mallet: Useful for gently tapping joints apart or seating new components without causing damage.
- Wood Glue: High-quality wood glue (PVA or hide glue) for strong, lasting bonds.
- Clamps: Various types (bar clamps, pipe clamps, spring clamps) to hold pieces securely while glue dries.
Having the right tools for repair ensures structural integrity, making the piece not only beautiful but also functional and robust. Precision in these initial stages prevents future issues, laying a solid foundation for the remainder of the restoration process. Don’t rush this part; a sturdy foundation is key to a lasting result.
Stripping and Sanding Supplies
Removing old finishes is perhaps the most labor-intensive part of restoration, but it’s crucial for achieving a smooth, even surface for new finishes. Chemical strippers can soften stubborn paint or varnish, while sanding removes residue and prepares the wood.
- Chemical Stripper: Gel or liquid strippers designed for furniture, along with plastic scrapers to remove softened finish.
- Sandpaper: Assorted grits, from coarse (80-100 grit) for removing material to fine (220+ grit) for final smoothing.
- Sanding Blocks/Power Sanders: Hand sanding blocks for control in detailed areas, and orbital sanders for flat surfaces to save time and effort.
- Tack Cloths: For picking up fine dust particles before applying new finishes.
Investing in a variety of sandpaper grits allows for gradual refinement of the surface, crucial for a professional-looking finish. Remember, the quality of your sanding directly impacts the final appearance of your piece, making it a stage where patience and attention to detail pay off significantly.
Finishing Materials
The final step in restoration is applying a new finish, which protects the wood and enhances its beauty. The choice of finish depends on the desired look and the furniture’s intended use.
- Stains: Oil-based, water-based, or gel stains to color the wood while allowing the grain to show through.
- Sealants/Topcoats: Polyurethane (oil or water-based), shellac, lacquer, or wax for durability and protection.
- Brushes and Applicators: High-quality brushes or foam applicators for even finish application.
- Mineral Spirits/Water: For cleaning brushes and thinning oil-based products, or water for water-based products.
Experimenting with different finishes on scrap wood is advisable to understand how they react with the specific wood type. This ensures you achieve the desired aesthetic without surprises, leading to a truly personalized and professional outcome. The finishing stage brings all your efforts together, revealing the transformed beauty of the piece.
With these essential tools and materials, you’ll be well-equipped to tackle most DIY furniture restoration projects. Remember to research and understand each product before use, always prioritizing safety and proper application techniques for the best results.
Step-by-Step Guide to Furniture Restoration
Bringing an old piece of furniture back to life can seem daunting at first, but by breaking the process down into manageable steps, it becomes an enjoyable and rewarding endeavor. This guide outlines the typical stages of furniture restoration, from initial assessment to the final touches, providing a roadmap for successful DIY projects.
Each step is crucial and builds upon the previous one. Rushing through or skipping a stage can compromise the final outcome, affecting both the aesthetics and durability of your restored piece. Patience, attention to detail, and a willingness to learn are your best companions throughout this journey. Remember, the goal is not just to fix, but to rejuvenate and redefine.
Step 1: Assessment and Preparation
Before diving into any work, take time to thoroughly inspect your furniture. Identify all existing damage, structural weaknesses, and the type of finish currently present. This assessment dictates the tools and materials you’ll need and helps you plan your restoration strategy. Consider the piece’s history and character when deciding on your approach.
- Examine for Damage: Look for loose joints, cracks, missing pieces, water damage, or pest infestations.
- Identify Finish Type: Determine if it’s paint, varnish, shellac, or lacquer, as this affects stripping methods.
- Clean Thoroughly: Remove dirt, grime, and cobwebs. A simple clean often reveals the true condition of the piece.
Preparation also involves setting up your workspace. Ensure good ventilation, cover floors to protect from spills, and organize your tools for easy access. A well-prepared area streamlines the process and ensures a safer working environment. This initial phase sets the tone for the entire project, making future steps more efficient.
Step 2: Disassembly and Repair
For more complex pieces, careful disassembly may be necessary to access hidden joints or refinish individual components. Documenting the process with photos can be invaluable for reassembly. As items are taken apart, clean and label all hardware to avoid losing small screws or bolts.
Once disassembled, focus on structural repairs. Loose joints can be reinforced by scraping away old glue and applying fresh wood glue, clamping them securely until dry. Missing or broken pieces might require wood filler, epoxy, or even crafting new parts from scratch. Patience is key here; a strong foundation is vital for a durable restoration.
Minor blemishes, such as small dents or scratches, can often be addressed at this stage. Steaming wood can sometimes lift dents, while thin cracks can be filled with wood putty. Allow all repairs to fully cure before moving on to the next stage, ensuring maximum stability for the piece.
Step 3: Stripping Old Finishes
Removing the old finish reveals the natural beauty of the wood beneath. This step can be messy and requires appropriate safety measures. Chemical strippers are effective for multiple layers of paint or varnish, while heat guns can be used with caution on stubborn areas. Always test strippers on an inconspicuous area first.
- Apply Stripper: Follow product instructions, applying an even layer and allowing it to sit until the finish bubbles or softens.
- Scrape Gently: Use a plastic or dull metal scraper to remove softened finish. Avoid digging into the wood.
- Clean Residue: Use mineral spirits or water (depending on the stripper type) to clean off any remaining residue.
For pieces with minimal finish or delicate veneers, gentle sanding might be sufficient, skipping harsh chemicals entirely. Remember that some antique finishes, like true shellac, can often be dissolved with denatured alcohol, which is less aggressive than commercial strippers. Your assessment in Step 1 will guide this choice, ensuring the method matches the material.
Step 4: Sanding for a Smooth Surface
Sanding is arguably the most critical step for achieving a professional finish. It smooths the wood, removes any remaining imperfections, and prepares the surface for the new finish to adhere properly. Start with a coarser grit (e.g., 100-120) to remove scratches or remaining finish, then gradually move to finer grits (e.g., 150, 180, 220).
Always sand with the grain of the wood to prevent unsightly scratches. For intricate areas, hand sanding blocks or specialized detail sanders are invaluable. After each grit, wipe down the surface thoroughly with a tack cloth to remove all dust before proceeding to the next finer grit. Dust can embed in the finish, causing a rough, undesirable texture.
Don’t skip grits; moving too quickly from coarse to fine sandpaper won’t fully remove the scratches from the previous grit. The goal is a uniform, silky-smooth surface, which is the foundation for a beautiful final finish. This meticulous attention to detail at the sanding stage truly elevates the quality of your restoration.
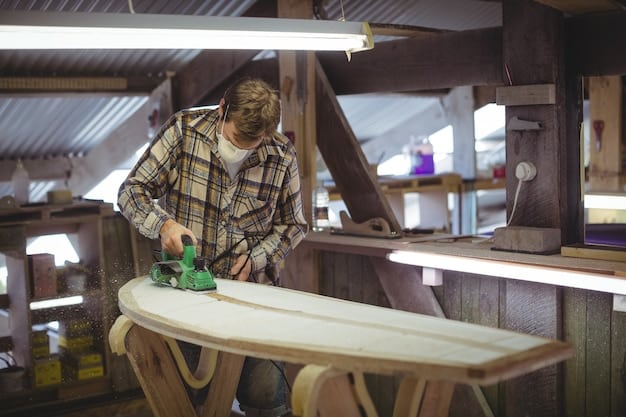
Step 5: Applying the New Finish
This is where your vision truly comes to life. The type of finish you choose will dictate the application method and the final look. Whether it’s stain, paint, oil, wax, or varnish, always apply thin, even coats to prevent drips and ensure proper curing.
- Staining: Apply stain with a brush or cloth, allowing it to penetrate, then wipe off excess. Test on an inconspicuous area or scrap wood first.
- Painting: Apply primer if needed, then multiple thin coats of paint, allowing ample drying time between coats. Lightly sand between coats for a smoother finish.
- Protective Topcoats: Apply polyurethane, lacquer, or shellac in thin layers, following product instructions for drying times and recoating.
Several thin coats are always better than one thick coat, as this reduces runs, enhances durability, and provides a more professional appearance. Lightly sand between coats with a very fine grit (e.g., 320-400), wiping away dust, to ensure optimal adhesion and a super-smooth feel. This final stage requires patience and precision to achieve a lasting and beautiful result.
Step 6: Reassembly and Hardware Installation
Once all finishes are fully cured, reassemble the furniture carefully. Use the photos you took during disassembly as a guide. Clean and polish existing hardware, or replace it with new, complementary pieces to refresh the look. Ensure all joints are secure and functional, conducting a final inspection for overall stability.
This stage is often a culmination of all your hard work, as the piece begins to take its final, transformed shape. Take your time, making sure every screw is tight and every joint fits perfectly. A well-assembled piece is not only aesthetically pleasing but also safe and long-lasting, embodying the true spirit of thoughtful restoration.
By following these steps, anyone can successfully embark on a furniture restoration journey, turning forgotten pieces into cherished treasures that reflect personal style and contribute to a more sustainable lifestyle. Embrace the process, learn from each project, and enjoy the satisfaction of creating something beautiful with your own hands.
Achieving Professional Results on a DIY Budget
One of the most compelling reasons to undertake DIY furniture restoration is the significant cost savings. While professional restoration can be expensive, achieving impressive, near-professional results at home is entirely possible on a budget. It’s not about cutting corners, but rather about smart material choices, efficient tool usage, and embracing resourcefulness. Focusing on technique and understanding materials allows you to elevate your craftsmanship without inflating expenses.
The key lies in knowing where to spend and where to save. For instance, sometimes a high-quality hand tool can outperform a cheap power tool, proving to be a better investment in the long run. Similarly, opting for clear topcoats over expensive specialty paints can make a big difference in expenditure. It’s about maximizing value and minimizing unnecessary outlay, all while honing your skills.
Smart Sourcing of Furniture and Materials
The first step to major savings is acquiring furniture at little to no cost. Look for hidden gems in places where others overlook them. Second-hand stores and online marketplaces are treasure troves for pieces with good bones that just need a little TLC. Patience is a virtue when hunting for furniture; the right piece will eventually appear.
- Thrift Stores/Charity Shops: Often have sturdy, well-built pieces at rock-bottom prices.
- Yard Sales/Estate Sales: Prime opportunities for deals, especially on the last day when sellers are eager to clear out.
- Curbside Finds/Freebies: Keep an eye out for pieces left for trash – often they just need minor repairs or a new finish.
When it comes to materials, consider buying in bulk for common consumables like sandpaper or wood glue if you plan multiple projects. Opt for generic brands of chemical strippers or paints where quality isn’t significantly compromised. Sometimes, a simpler, more affordable finish like Danish oil or polyurethane can yield equally beautiful and durable results compared to multi-step, expensive lacquers. Reuse and repurpose whatever you can, from old rags for applying oil to salvaged hardware.
Mastering Basic Techniques for Flawless Finishes
Technical skill is a greater determinant of professional results than expensive materials. Focusing on meticulous surface preparation, proper sanding techniques, and consistent application methods will transform your outcomes. Even the finest stain will look poor on an improperly sanded surface. Similarly, an uneven paint job diminishes the visual appeal of any piece.
- Thorough Cleaning: Ensuring a perfectly clean surface before applying any finish prevents embedded dirt and uneven absorption.
- Consistent Sanding: Gradual progression through grits, always with the grain, is crucial for a butter-smooth base.
- Thin, Even Coats: Applying multiple thin layers of finish prevents drips, streaks, and ensures even curing and durability.
- Brush Strokes: Learning proper brush technique for smooth, even application, or using foam rollers for larger flat surfaces.
Practice on scrap wood to perfect your staining, painting, or topcoat application before moving to your main project. Understanding how different finishes behave and controlling your tools are skills that develop over time and directly impact the final product’s quality. This deliberate practice turns potential pitfalls into learning opportunities and ensures your budget doesn’t limit your potential for excellence.
Saving on Specialized Tools and Supplies
You don’t need a professional workshop full of expensive tools to achieve great results. Many tasks can be accomplished with basic hand tools or by renting specialized equipment when absolutely necessary. Instead of buying individual small items, consider starter kits that bundle common tools, which often provides better value.
For example, instead of a high-end orbital sander, a good quality sanding block and elbow grease can go a long way. If a project requires a specific power tool you don’t own (like a biscuit joiner), consider borrowing one from a friend or renting it for a day. This approach prevents unnecessary purchases for tools that might only see occasional use, ensuring your initial investment remains manageable and focused on versatile, everyday items. Embracing this resourceful mindset helps you stretch your budget further without compromising on the quality of your work.
Ultimately, achieving professional restoration results on a DIY budget is about intelligent planning, skill development, and a resourceful approach to sourcing and execution. It’s proof that stunning transformations don’t require deep pockets, just dedication and a willingness to learn.
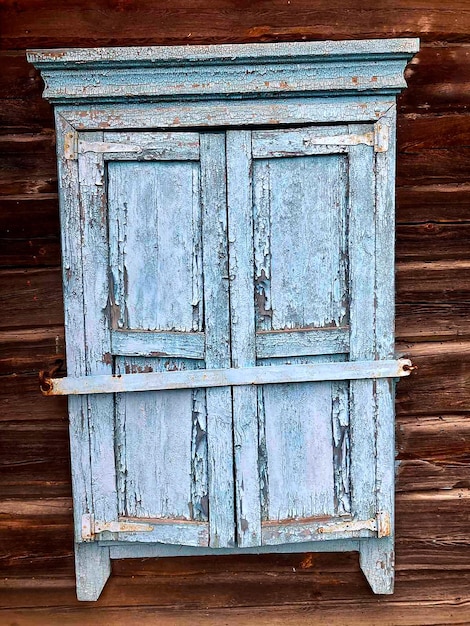
Creative Approaches to Furniture Redesign and Upcycling
Beyond simple restoration, furniture pieces offer a blank canvas for creative expression through redesign and upcycling. This goes beyond merely fixing; it’s about reimagining and transforming. Upcycling is about giving an item a new purpose or a drastically altered aesthetic, often turning discarded pieces into unique, functional works of art. It’s an exciting way to personalize your home while showcasing your ingenuity.
These creative approaches not only refresh the look of old furniture but also allow for a deeper connection to the piece as you infuse it with your personal style. It’s about seeing potential where others see junk, and with a bit of imagination, turning that potential into something truly extraordinary. This artistic freedom is one of the most rewarding aspects of furniture transformation.
The Art of Upcycling: Beyond Repainting
While a fresh coat of paint can certainly revitalize a piece, true upcycling involves more profound changes. It’s about altering function, combining multiple pieces, or employing innovative techniques to create something entirely new and unexpected. This pushes the boundaries of traditional restoration, making furniture a medium for artistic expression.
- Repurposing: Transforming a dresser into a bathroom vanity, an old suitcase into a side table, or a crib into a desk.
- Adding New Features: Incorporating shelves, built-in lighting, or charging stations to enhance functionality.
- Combining Elements: Merging parts from different furniture pieces to create a unique hybrid design.
Consider the structure and original purpose of a piece, then brainstorm how it could serve a different need in your home. This imaginative leap often leads to highly functional and visually striking items that perfectly reflect your individual needs. Upcycling encourages a dynamic relationship with furniture, viewing it as adaptable rather than fixed.
Embracing Mixed Media and Textural Finishes
Don’t limit yourself to traditional wood stains and paints. Experimenting with different materials and finishes can add depth, texture, and a truly unique character to your furniture. Mixed media allows you to break free from conventional aesthetics, creating pieces that stand out and tell a story.
Think about incorporating fabrics, metallic accents, or even resin. Decoupage, stenciling, or distressing techniques can add visual interest and a sense of history or playfulness. For instance, applying a plaster or chalk paint finish can give a modern piece an antique, textured look, while adding brass inlays can elevate a simple wooden table.
- Distressing and Glazing: Creating an aged, weathered look with layers of paint and glaze.
- Fabric and Upholstery: Adding fabric panels or fully reupholstering sections for comfort and visual appeal.
- Metallic Accents: Using metallic paints, leafing, or hardware to add a touch of glamour or industrial chic.
These techniques allow for personalized expression that perfectly complements your home’s decor. Textural finishes not only engage the eye but also the touch, adding another layer of sensory experience to your furniture. Embracing this layered approach expands the possibilities beyond flat color, inviting a richer, more complex aesthetic.
Integrating Smart Functionality and Modern Design
Redesigning isn’t just about aesthetics; it’s also about enhancing functionality to meet contemporary needs. Old furniture often lacks features common in modern design, but with a bit of ingenuity, you can integrate smart solutions that make classic pieces more useful and convenient for today’s lifestyle.
Consider adding discreet charging stations to a nightstand, repurposing a dresser drawer into a pet bed, or installing pull-out shelves inside a cabinet for easier access. These thoughtful additions blend the charm of vintage pieces with the practical requirements of modern living. This fusion of old and new demonstrates ingenuity and forward-thinking design.
- Hidden Storage: Creating compartments or false bottoms for discreet storage.
- Integrated Lighting: Adding LED strips under shelves or inside cabinets for ambiance and utility.
- Mobility: Attaching high-quality casters to heavy pieces for easy rearrangement.
By blending creative redesign with functional upgrades, you transform simple furniture into bespoke items that serve a dual purpose: preserving the past while confidently stepping into the future. This approach showcases how furniture can evolve, remaining relevant and cherished for generations to come, embodying true adaptive design.
Common Pitfalls and How to Avoid Them
While DIY furniture restoration is incredibly rewarding, it’s not without its challenges. Beginners often encounter common pitfalls that can lead to frustration or less-than-ideal results. Recognizing these potential issues beforehand can save a lot of time, money, and effort, ensuring a smoother and more successful restoration journey.
Most problems arise from rushing the process, using the wrong materials, or neglecting crucial preparatory steps. By understanding and actively avoiding these missteps, you can significantly improve the quality of your work and enjoy the process more. Remember, patience and proper planning are your greatest allies in any DIY endeavor.
Skipping Thorough Preparation
One of the most frequent mistakes restorers make is underestimating the importance of preparation. Rushing through cleaning, sanding, or repair ultimately compromises the final finish. Any dust, grime, or imperfections left on the surface will be magnified once a new finish is applied, creating an uneven and unprofessional look.
- Inadequate Cleaning: Greasy residue or hidden dirt can prevent new finishes from adhering properly, leading to peeling or bubbling. Always clean thoroughly with appropriate cleaners.
- Insufficient Sanding: Failing to sand through all grits or not sanding with the grain will leave visible scratches and an uneven texture, especially under stain or clear coats.
- Unaddressed Repairs: Neglecting loose joints or minor cracks before finishing means the piece remains structurally unsound, and cosmetic fixes won’t last.
Think of it as building a house: a weak foundation dooms the entire structure. Similarly, a poorly prepped furniture piece will never achieve a truly professional finish. Dedicate ample time to each preparatory step, and you’ll find the finishing stages are far more enjoyable and yield superior results.
Choosing the Wrong Products or Techniques
The vast array of restoration products can be overwhelming, and selecting the wrong type of stripper, glue, or finish for your specific project can lead to disastrous outcomes. Using an incompatible product can damage the wood, create adhesion issues, or simply not achieve the desired effect.
For example, attempting to strip a delicate veneer with a harsh chemical stripper designed for solid wood can cause the veneer to lift or bubble. Similarly, using water-based paint over an oil-based primer without proper preparation can result in peeling. Relying solely on anecdotal advice without researching product compatibility is a common pitfall.
- Product Compatibility: Always check if new finishes are compatible with existing ones (if not fully stripped) and with each other (e.g., specific primers and paints).
- Wood Type vs. Finish: Certain woods react differently to stains and sealants; research how your wood species will interact with your chosen finish.
- Technique Application: Applying finishes too thickly, not allowing adequate drying time between coats, or ignoring environmental conditions (humidity, temperature) can cause issues.
Always read product labels and instructions thoroughly. When in doubt, consult product data sheets online or ask for advice at a specialized paint or hardware store. Test new products on an inconspicuous area or a piece of scrap wood to observe their behavior before applying them to your main project. This proactive approach ensures your materials work harmoniously to achieve the best possible outcome.
Rushing the Process
Patience is arguably the most valuable tool in furniture restoration. Each step, from stripping to applying the final topcoat, requires adequate time for drying, curing, or setting. Rushing can compromise the integrity and durability of your work, often forcing you to restart or undertake costly repairs.
For instance, applying a second coat of paint or varnish before the previous one is fully cured can lead to tackiness, uneven color, or trapped moisture. Similarly, assembling a piece before the glue has completely set can result in weak joints that fail over time. The temptation to see immediate results is strong, but resisting it pays dividends.
- Drying Times: Always adhere strictly to recommended drying and cure times for glues, stains, and finishes.
- Layering: Apply multiple thin coats rather than one thick one, allowing each to dry fully.
- Temperature and Humidity: Awareness of environmental conditions; high humidity can significantly extend drying times.
By simply allowing each stage to complete fully, you ensure maximum adhesion, durability, and a professional-grade finish. Embrace the process, enjoy each step, and understand that good things take time. This disciplined approach is essential for avoiding frustrating setbacks and guaranteeing a high-quality, long-lasting restoration.
Maintaining Your Restored Furniture
Restoring a piece of furniture is a significant investment of time, effort, and care. To ensure your hard work lasts for years to come and that the piece continues to enhance your home, proper maintenance is essential. Just like any valuable possession, restored furniture benefits from ongoing attention and protective measures. This extends its beauty and functionality, safeguarding your financial and creative investment.
Understanding the specific needs of your furniture’s finish and material is key to preserving its integrity. Regular cleaning, thoughtful placement, and occasional touch-ups can prevent minor issues from becoming major problems, ensuring your cherished piece remains a focal point in your living space for generations.
Regular Cleaning and Protection
The most straightforward way to maintain restored furniture is through consistent, gentle cleaning. Dust and grime can accumulate, dulling finishes and attracting moisture. However, the type of cleaning agent will depend heavily on the finish you applied.
- Dusting: Use a soft, lint-free cloth (microfiber is excellent) to dust regularly. For intricate carvings, a soft brush can be effective.
- Cleaning Spills: Wipe up spills immediately with a damp cloth, then dry thoroughly. Avoid abrasive cleaners or excessive water, which can damage finishes.
- Appropriate Cleaners: For oiled or waxed finishes, use product-specific cleaners. For polyurethaned or lacquered surfaces, a mild soap and water solution, followed by a dry wipe, is usually sufficient. Avoid silicone-based polishes unless you know the finish can handle them, as they can build up and become difficult to remove.
Protecting surfaces from direct damage is equally important. Use coasters under drinks, placemats under dishes, and felt pads under decorative items to prevent scratches and water rings. For sun-exposed pieces, consider UV-protective window films or rotate the furniture to ensure even light exposure, preventing fading and cracking. These small habits significantly extend the lifespan of your finish.
Environmental Considerations
The environment in which your furniture resides plays a crucial role in its longevity. Extremes in temperature and humidity, as well as direct sunlight, can all cause damage. Wood is a natural material that reacts to its surroundings, expanding and contracting, which can lead to cracks or warping in unstable conditions.
- Humidity Control: Aim for a stable indoor humidity level, ideally between 40-50%. Use humidifiers in dry climates and dehumidifiers in humid ones. Avoid placing furniture directly next to vents or radiators.
- Temperature Stability: Sudden temperature changes can stress wood. Keep furniture away from heat sources and air conditioning units.
- Sunlight Exposure: Direct, prolonged sunlight can fade finishes and dry out wood, potentially causing cracks. Place furniture away from direct sun or use curtains/blinds.
Understanding these environmental factors allows you to make informed decisions about furniture placement and home climate control. A stable environment minimizes the natural movement of wood, preserving the integrity of joints and finishes. It’s an investment in the long-term health and beauty of your restored pieces, preventing many common forms of deterioration.
When to Seek Professional Help
While DIY restoration is empowering, there are instances when consulting a professional restorer is the wisest course of action. Recognizing your limits and knowing when to call in an expert can prevent irreversible damage and preserve the true value of an antique or a particularly complex piece.
- Valuable Antiques: For genuinely antique or historically significant pieces, consult a professional to preserve their original integrity and value. Amateur restoration can significantly devalue such items.
- Extensive Structural Damage: If a piece has widespread rot, severe warping, or complex joinery failures, a professional likely has the specialized tools and expertise for a robust repair.
- Hazardous Materials: If you suspect the presence of lead paint, asbestos (in old upholstery padding), or other hazardous materials, do not proceed without professional assessment and remediation.
A professional restorer can also advise on techniques that are beyond your current skill set, or provide specialized materials unobtainable to the average DIYer. Sometimes, just a consultation can equip you with the knowledge needed to proceed confidently. Knowing when to step back and seek expert advice ensures that your valued furniture receives the best possible care, guaranteeing its longevity and enduring beauty.
| Key Point | Brief Description |
|---|---|
| 💰 Cost Savings | Restore furniture for significant savings over buying new, especially for quality pieces. |
| ♻️ Sustainability | Reduces waste, lowers carbon footprint by reusing existing items. |
| 🛠️ Skill Development | Learn valuable DIY skills, from carpentry to finishing techniques. |
| ✨ Customization | Personalize pieces to match unique styles and home decor. |
Frequently Asked Questions About DIY Furniture Restoration
▼
Beginners should start with solid wood pieces with simple shapes and minimal decorative carved elements. Desks, small tables, or dressers without intricate detailing are ideal. Avoid upholstered items or pieces with veneer damage, as these require more specialized skills and tools for a first project. Simple forms allow you to focus on core techniques like sanding and finishing.
▼
Look for solid wood construction, sturdy joints (even if loose, they’re often repairable), and appealing design. Avoid pieces with extensive woodworm damage, severe warping beyond repair, or composite materials that are difficult to work with. If it has good “bones” and you like its style, it’s generally a good candidate for restoration, often outweighing the cost of new.
▼
Common mistakes include inadequate surface preparation (poor cleaning, insufficient sanding), rushing drying times between coats, and choosing the wrong type of finish for the wood or intended use. Not wearing proper safety gear and failing to properly ventilate your workspace are also critical errors that can lead to health hazards. Patience is key to great results.
▼
Generally, yes, especially if you compare the cost of a high-quality restored piece to a new, similarly high-quality item. While materials cost money, the labor is free. For basic furniture, you might find new items cheaper, but they often lack the durability and character of restored pieces. The true value is in acquiring a superior item for less.
▼
Protect your furniture by using coasters, placemats, and felt pads under items. Avoid placing it in direct sunlight or near heat sources. Maintain stable humidity levels indoors. Regular dusting with a soft cloth and cleaning with appropriate, gentle products further preserve the finish. Proactive care significantly extends the lifespan of your beautiful restoration projects.
Conclusion
The journey of DIY furniture restoration is far more than just a means to acquire affordable furnishings; it is a blend of practical skill, artistic expression, and environmental stewardship. By choosing to breathe new life into old pieces, you not only save hundreds of dollars but also contribute significantly to reducing waste and preserving valuable resources. The satisfaction derived from transforming a neglected item into a cherished, functional part of your home is immeasurable, fostering a deeper connection to your living space. This guide has aimed to demystify the process, offering a clear path from uncovering potential to enjoying a beautifully renewed piece. Embrace the challenge, learn from each stroke of the brush, and discover the profound rewards of giving old furniture a vibrant, new lease on life.


